Orginal Images
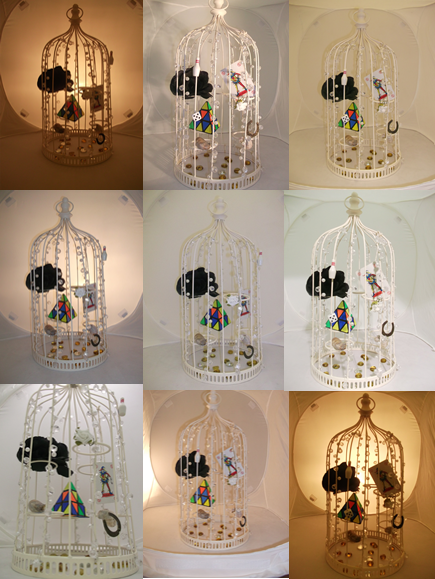
For my digipak, I needed to take my own images to use to make my digipak unique. I borrowed a 'vinatge' bird cage from a friend to take my original images. I brought in several items from home to represent different possible songs to fill the bird cage. I decided to use a light diffuser box as a background. I thought this would help me create several different interesting shots with varied lighting. Examples of this can be seen below.


I am featuring ribbon twice on my digipak. One to 'hold up' the birds cage on the front and another to go all the way across the inside. The image I took which can be seen in the top right hand corner above is the one I have chosen to hold the bird cage. The image just below is the one I am going to use for the inside of the digipak. The shot for the birdcage is one of my favourites from my photoshoot. I would have used it again on the inside of my digipak to help reinforce the house style. However, for this to work the image would have had to of been streched making it look out of place.

I was happy with how my images turned out. I decided to use the image featured in the centre of the top row. I chose this one because I liked how the light highlighted my objects and also reflected on the beads woven around the cage.
My next step was to upload this image into Photoshop to edit it into my final digipak. I tried several ways to remove the lines from the light diffuser box. I first tried the cloning tool. This copies pixels from one place to another. This worked but did not look effective because of the difficulties of copying the exact light from once place to another. I then tried fiddling with the lighting and contrast of the shot. This did help to remove the lines from the image but it made the bird cage blend into the background therefore loosing some of the image. The final technique I tried can be seen below. I used the magic wand tool to remove the background around the bird cage completely. I turned the tolerance down on this tool so it would pick up extra lines making it more accurate. However, I found that this tool could not completely distinguish between the background and the bird cage because of the similar colours. Therefore, some of the bird cage was being removed in this process. My attempt at this piece of editing can be seen below

After trying all of these techniques, I have decided that the best way to proceed is to re-shoot the images of my bird cage using a plain white background instead of a light diffuser box. I will take these images on the 15/11/2012.
My next step was to take images of the red ribbon which would feature on my digipak. I brought 2m of red ribbon from a fabric shop located in Chichester. I created several different patterns using this ribbon on white paper and took photographs. My original images can be seen below.

I am featuring ribbon twice on my digipak. One to 'hold up' the birds cage on the front and another to go all the way across the inside. The image I took which can be seen in the top right hand corner above is the one I have chosen to hold the bird cage. The image just below is the one I am going to use for the inside of the digipak. The shot for the birdcage is one of my favourites from my photoshoot. I would have used it again on the inside of my digipak to help reinforce the house style. However, for this to work the image would have had to of been streched making it look out of place.
No comments:
Post a Comment