Photoshop
To create my digipak, I used the photo modifying programme Adobe Photoshop elements 4.0. To begin with, I 'cut out' all of the objects that I was placing on my digipak. These included pieces of ribbon and the individual objects featured in the bird cage.
To cut out the piece of ribbon, I used the magic wand tool. I had to turn the tolerance down to make sure I didn't accidentally cut out any thin pieces of ribbon. I then went around the piece of ribbon to make sure all of the background was gone. In some places I had to use the magic background eraser to delete the background because the magic wand tool would differentiate the background from the ribbon. I then used the smude tool to round off any jagged pixels and make the image of the ribbon look more realistic. The results of this can be seen below:
To cut out the piece of ribbon, I used the magic wand tool. I had to turn the tolerance down to make sure I didn't accidentally cut out any thin pieces of ribbon. I then went around the piece of ribbon to make sure all of the background was gone. In some places I had to use the magic background eraser to delete the background because the magic wand tool would differentiate the background from the ribbon. I then used the smude tool to round off any jagged pixels and make the image of the ribbon look more realistic. The results of this can be seen below:

My next step for the piece of ribbon was to modify the lighting and contrast. I felt the ribbon was not red enough in the original image I chose to cut out. Therefore, by fiddling with the lighting and contrast, I managed to brighten it up to make it look more effective and visually attractive on my digipak. The difference in colour can be seen on the pieces of ribbon displayed on the digipak.

To cut out all of my objects for my digipak, I used the same process. I used the magic wand tool with the tolerance turned down followed by the smudge tool to make the image look professional. On some of the objects, I fiddled with the brightness and contrast to make them more visually attractive and stand out more. Some examples of my cut out objects can be seen below.

After cutting out my objects, I started to make my digipak. I decided to use my template that I used for my designs. I imported my template into photoshop and started to add my images. It became clear however, that the quality of my images was being lost on the template. This was because of the low pixelation on the template. My digipak on the template can be seen below.

I could have carried on using this template. However, the poor quality of my images, pieces of ribbon
and text were not reflecting the amount of work I had put into the digipak. I then decided, using the measurements on the digipak template, to create individual sections of the digipak and put them together at a later stage to create my final digipak.
After individually constructing the 5 different sections of my digipak, the front, back, spine, inside left and inside right sections, I used a tool on photoshop to flatten the image. This combined all the different layers into one image. I then saved the different files in a new format; JPEG format. This allowed them to be saved as pictures instead of Photoshop images. I then saved a new digipak PDF template, downloaded from the website http://www.discwizards.com/cd-dvd-artwork-templates.htm. Using the programme Page Plus, I imported the PDf and tehn added my images to it to construct my digipak.
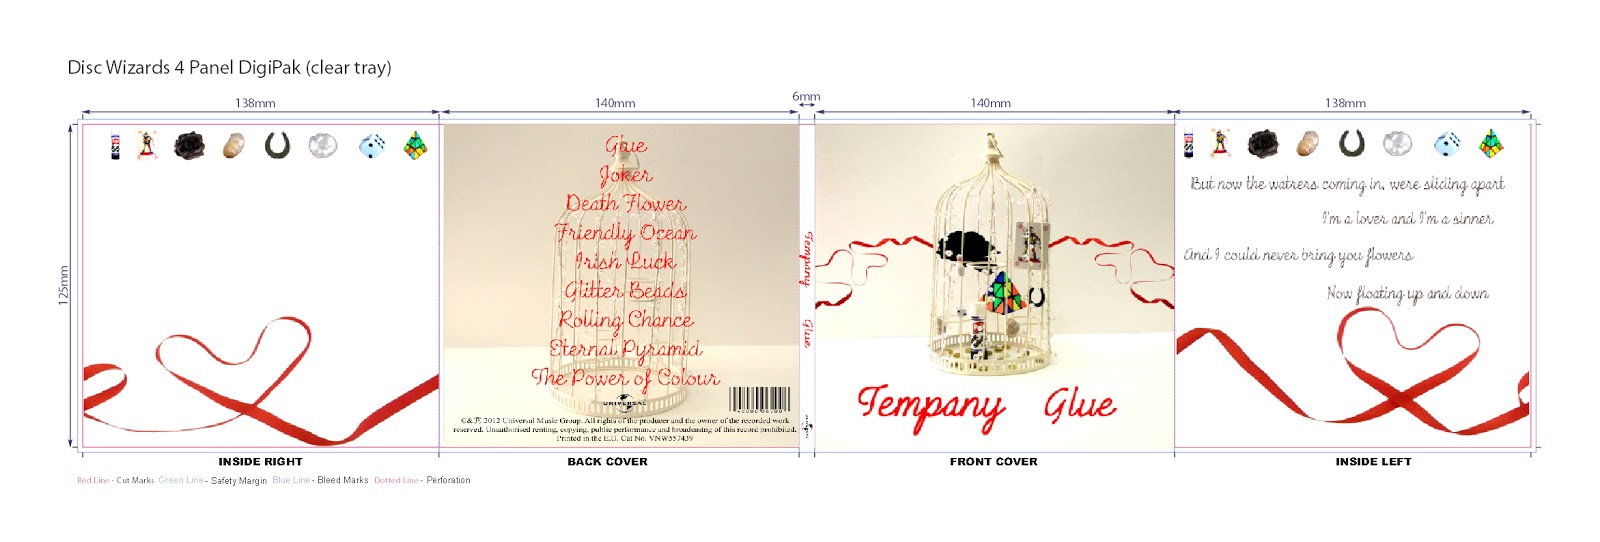
My final completed digipak can be seen below.
My final completed digipak can be seen below.
No comments:
Post a Comment